Hi Frightners!
Today I wanted to write a little about over analyzing your art because I find it to be something I have done way too much of in the past and it is often the reason I find myself with a million projects that I start and stop and often times never finish.
I supposed I can put this either in terms of being and artist in general or in terms of being a home haunter because I think both will slightly vary but for today I will focus on the home haunter aspect of over analyzing what we create.
Most every home haunter starts by purchasing props to create a scene with at their home for Halloween and each year we add a little more then a little more until we realize we have been bitten by the Halloween bug and no store bought prop can help us materialize our every creative idea so we force ourselves to being making the props we want or need to create the scenes we had envisioned in our sick and twisted minds!
It is important to remember at the very point we set out to create our very own hand made props that everyones level of artistic abilities is different and you cannot let any one image or video you see of a prop similar to the one you want to build be the reason you slow up progress on yours. It is always a learning process and that process needs to develop over time.
What tends to happen to me is that I see someone building the exact same prop I would like to create and I begin to analyze their prop vs mine. Shortly after I begin to ask myself various questions such as "why does my detail not look the same?" or "does my paint job make it look realistic enough?" I begin over analyzing everything I am doing and begin questioning everything I had planned too do. Will it be good enough? Is it good enough? These are the questions that begin to form in my head. I become so consumed with it needing to be exactly like the reference I saw that I do not even bother to work on it any more.
I recently began working on a Madame Leota Tombstone prop in which I am sculpting her face while looking at reference pictures of the original. Shortly into the process I got the feeling that it wasn't looking right and I needed to step back and rethink what I was doing. I ended up scraping the sculpt and starting over. As I got into the sculpt the second time around now taking a new direction with it I got the slight feeling the same thing was happening again! I didn't think what I was doing was terrible and liked plenty about it but compared to the picture reference it was not spot on. Here is where I began to over analyze what I was doing. Now I could very well scrap the work which I have done which would amount to maybe 2 hours of my time or I can push ahead and continue and finally I decided to do just that and continue on.
It's always hard to catch perfection. I am not sure you ever can really but you can always continue to better yourself and your skill set and learn from the experience in which case I am learning with this sculpt. My goal now is always to push through and finish and enjoy the fact that I can mark the project as being done and off my list and ready myself for the next. I can always sculpt another Madame Leota in the future and will take this one as my learning project but if I don't finish it I will have nothing to show for the time I did invest and I can never look back and say "wow look how far I have come!"
The moral of the story really is not to over analyze your art. Don't sweat the small stuff and let it hold you back from finishing what you had originally set out to do because after you finish each project you will get progressively better at your craft. You will learn new skill sets, tips and tricks to make you a better artist but that is only by doing and not by staring at a computer screen analyzing what other people are doing.
So go out and get to work on whatever new project or build you have in mind and don't let anything hold you back from creating your next work of art!
Frightuy~
Saturday, January 9, 2016

Monday, January 4, 2016
Sand casting a skull with kinetic sand.
Hello Frightners!
For some time now I have wanted to give sand casting a try. I first learned about sand casting in the book series created by Lynne and Shawn Mitchell How To Haunt Your House . I had received the first issue of the series as a Christmas gift some years ago and while flipping through it I came across the sand casting tutorial and thought how fun and useful it looked to be especially for casting smaller items.
Fast forward to today and I finally decided to give sand casting a try and I am glad I did! The catalyst for me to finally try sand casting was when my daughter received Kinetic Sand as a gift. The Kinetic Sand doesn't require water, holds it shape very well, and does not stick to anything. After playing around with it for a bit the light bulb went off in my head to give it a try and use it for sand casting.
I won't go into great detail about the process because you can easily look it up on line or check it out in the Mitchell's book but the gist of it is to find an object you want to make a casting of, press it into the sand to get the impression of the piece and fill the impression that has been left with hot glue. Once the glue dries you are left with a casting of the piece.
I choose a small baseball sized skull I had lying around and pressed it's face into the sand. It took about 3-4 glue sticks to fill up the void left behind and ensure that the glue filled it up fully and evenly with the sand leaving the back of the casting nice and flat. I would say about 2-3 minutes later the glue had cooled and I pulled the casting. Originally I had thought that maybe the kinetic sand which normally does not stick to anything would not stick to my casting but there was some slight clean up. I simply used a wood skewer to clean out the sand as best I could then ran the piece under water to get any sand that was left over off. It took a little time but the results (in my opinion) were well worth it.
I made two sized skulls with this method and while neither were perfect representations of the original they were good enough for my intended uses on tombstones and my future mausoleum build. I gave them a quick paint job each by using a base of acrylic black paint then a dry brush of white over top for a stone look.
Overall I would say sand casting is an enjoyable and easy process best served for small items that you may need a few multiples of. Larger castings aren't out of the question but you would have to test melting large portions of glue sticks in a pot for some fast pours because the time it would take to fill up a sand casted mold from a hot glue gun would take more time than this haunter thinks it would be worth.
I would be interested to see what other casting materials could be used using this technique like resins perhaps or various types or rubber or silicone but for the time being hot glue works for me. I would definitely suggest giving this a try. Even if you don't have anything you really need to cast up at the moment it is still a fun craft to do.
If you happen to give this s try or try other methods please let me know in the comments below and attach some pictures for us to see. Have fun with it and now on to the next creepy creation for the 2016 Haunt Season!
Frightguy~


For some time now I have wanted to give sand casting a try. I first learned about sand casting in the book series created by Lynne and Shawn Mitchell How To Haunt Your House . I had received the first issue of the series as a Christmas gift some years ago and while flipping through it I came across the sand casting tutorial and thought how fun and useful it looked to be especially for casting smaller items.
Fast forward to today and I finally decided to give sand casting a try and I am glad I did! The catalyst for me to finally try sand casting was when my daughter received Kinetic Sand as a gift. The Kinetic Sand doesn't require water, holds it shape very well, and does not stick to anything. After playing around with it for a bit the light bulb went off in my head to give it a try and use it for sand casting.
I won't go into great detail about the process because you can easily look it up on line or check it out in the Mitchell's book but the gist of it is to find an object you want to make a casting of, press it into the sand to get the impression of the piece and fill the impression that has been left with hot glue. Once the glue dries you are left with a casting of the piece.
I choose a small baseball sized skull I had lying around and pressed it's face into the sand. It took about 3-4 glue sticks to fill up the void left behind and ensure that the glue filled it up fully and evenly with the sand leaving the back of the casting nice and flat. I would say about 2-3 minutes later the glue had cooled and I pulled the casting. Originally I had thought that maybe the kinetic sand which normally does not stick to anything would not stick to my casting but there was some slight clean up. I simply used a wood skewer to clean out the sand as best I could then ran the piece under water to get any sand that was left over off. It took a little time but the results (in my opinion) were well worth it.
I made two sized skulls with this method and while neither were perfect representations of the original they were good enough for my intended uses on tombstones and my future mausoleum build. I gave them a quick paint job each by using a base of acrylic black paint then a dry brush of white over top for a stone look.
Overall I would say sand casting is an enjoyable and easy process best served for small items that you may need a few multiples of. Larger castings aren't out of the question but you would have to test melting large portions of glue sticks in a pot for some fast pours because the time it would take to fill up a sand casted mold from a hot glue gun would take more time than this haunter thinks it would be worth.
I would be interested to see what other casting materials could be used using this technique like resins perhaps or various types or rubber or silicone but for the time being hot glue works for me. I would definitely suggest giving this a try. Even if you don't have anything you really need to cast up at the moment it is still a fun craft to do.
If you happen to give this s try or try other methods please let me know in the comments below and attach some pictures for us to see. Have fun with it and now on to the next creepy creation for the 2016 Haunt Season!
Frightguy~


Thursday, December 31, 2015
Building Master Gracey
Hello Frightners!
Today's post is all about my Master Gracey Tombstone Build for the 2015 Haunt.
Now if I have not stated it before I will once more...I love the Disney Haunted Mansion. It has to be the main reason I took a liking to the weird and macabre and a definite reason I love haunting.
Every year that I have done a yard display I have for the most part used the same foam carved tombstones which I created in one night back in 2012. I remember having just moved into our new home and being so excited about creating my first ever scene on my front lawn but all of my older stones were pretty worn out so I bought foam and quickly dremeled various epitaps into each stone, added some rough cracks here and there then furiously painted each. It was so late at night at one point and I had my garage door open while working on adding some highlights with some spray paint that cops had stopped in front of my house wondering what I was doing! It felt funny telling them that I was making prop tombstones for Halloween but they ok have fun shook their heads and drove along.
I made 13 tombstones that year and remember chasing half of them down the block when the winds and rains of super storm sandy came bustling through. At that very moment I vowed that one day I would make durable tombstones that would not only look real but would stand both the tests of time and the crazy weather that we can experience in NJ from time to time.
The years following 2012 I scaled back on using tombstones to go with a more natural look of scarecrows and cornstalks but this year I knew I wanted to bring back the cemetery and I had to begin the task of create a more sturdy stone so I began thinking about how I was going to go about it.
I wasn't really trying to re-invent the wheel since there are plenty of techniques that can be found on line about tombstone prop making but I wanted to think out the process for myself and find a solution that worked best for me. In the end I was going to have to store these things and I didn't ever want to have to make them again so finding the right solution was important to me.
At first I thought about a hollow construction made out of plywood which would make them slightly lightweight but heavy enough that they would not fly away on me. Where I struggled with this design idea was how I would fill in the gaps on the top and sides of the stone. If I made any unique curves I just didn't know how would I close them up. I toyed with the idea of running wood laminate around the outside as well as the possibility of using spray foam and that's where things started to click for me. I would trace my tombstone shape onto wood and cut out the same shape for the front and back then use insulation foam like I normally would to make a tombstone and sandwich it in between both pieces of wood until I got the desired depth I wanted for the stone.
I used the front of the tombstone which I cut from wood as a template to trace and cut out the pieces of foam and began layering or I should say stacking my tombstone sandwich up until I reached my desired depth. Since the foam I was using was older left over foam it didn't cut all that well so the edges were pretty jagged after being cut but that was ok, I was going to use a rasp and sander to smooth the edges out once everything was glued together.
I used a combination of gorilla glue and great stuff foam in between each layer, stacked it all together then set some patio stones on top and left it to dry. Once I was convinced the stone was completely dry I began to sand down the edgesso that everything was nice and even but there were still gaps and cracks and I wanted the sides and top of the stone to be nice, smooth and seamless so next up on my mind was how was I going to fill everything in and smooth it out?!!
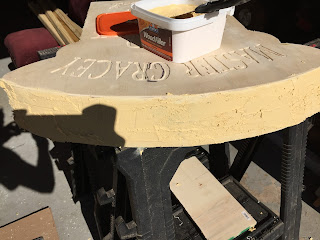
When contemplating what I should used to fill in the gaps and cracks on my tombstones edges I thought of multiple ways I could do it from Monster Mud to bondo but ultimately I used what I already had on hand and that was wood filler. I knew it would dry hard so I just said the hell with it and figured this was all trial and error anyways but it worked out quite nice! I spread the wood filer on with a spatula and in areas that weren't as easy I simply used my hands. I would say it took me 2-3 passes with the wood filer before I looked at all the edges and they seemed fully filled in. Once dry I proceeded to sand the sides until smooth. I choose to not fill in the underside of the tombstone with the wood filer and instead seal it off with plywood as well in order for the stone to be able to sit flush on the above ground tomb that I would later build.
The next step (which I should have explained more towards the beginning of the write up) was the epitaph. I was able to find a good copy of the Master Gracey Epitaph online and took that into a computer program I had Illustrator and sized it accordingly. Once sized I printed it out then used the printout to trace and transfer the letters onto the wood. Originally I was going to use a projector to project the image of the tombstone and trace the letters like that but found it to be a bit difficult so I scrapped that idea fairly quickly.
After all the letters were in place I used a dremel and routers bit to router out the letters into the wood. Now I had never really used a router before so it wasn't so easy getting all the letters to be perfect especially in wood so while I wouldn't rule out doing this method again I think I would instead glue a piece of 1" foam to the front wood piece and dremel the words into it just for the ease of doing it because etching out the letters in the wood really took some time and patience but I got through it. Some of the letters didn't come out great but you could read the entire wording and after paint and putting it outside at night I felt the few flaws it did have wouldn't really be noticeable to the average Joe.
The painting process was the easiest part. Time was dwindling down so I knew I wasn't going to be able to match up the paint scheme of the original so I choose to give the stone a black base then bought my ever so favorite stone spray paint which gave it that nice stone texture. To age it up a bit I sprayed on some watered down black paint and dry brushed a few areas with some green and browns. I went back into the type and painted in each letter with black just so they would stand out and poof, just like that the stone was complete!
The next and final task was the above ground tomb the stone would sit on. Now the Disney version is actually quite nice. It is a brick base, the top edges are surrounded by a small black metal gate with golden toppers at each of the four corners and the center is real grass. The stone actually sits at the back end of the tomb in the grass.
How the heck was I going to pull all of this off I wondered?!! My time was very short and to reiterate I was also short on money so I searched around my garage and found left over faux brick siding I had used years ago on the first set of columns I ever built for Grimlock Manor. I also had plenty of spare lumber, green outdoor carpeting and rope so I decided these were the items I would use and all I had to do was find some finials online.
I constructed a frame for the tomb out of some 2 x 2s I had then covered the the front and both sides with the brick paneling but left the back open which I will get to why I did that shortly. I then covered the top of the tomb with a flat piece of plywood. Around the edges I drilled hole to fit in PVC piping which would be my fencing. I added my outdoor grass carpet to the top of the plywood, painted the PVC piping black, added my finials to the top of each PVC pipe then ran rope around each piece of PVC. I had wanted black chain but again just went with what was handy.
Now that most of the tomb was set I drilled 2 holes in the base of the tombstone and to matching holes on the base of the tomb. I inserted PVC into each hole of the tombstone then slide the tombstone into the two holes I drilled in the base of the tomb. This allowed the tombstone to sit very sturdy on the tomb and not be blown over by any strong winds. The PVC was also long enough to slightly stick into the ground under the tomb and having the backside open I was able to adjust everything so it fit nice and snug.
Once it was all in place I attached mini spot lights to the front of the tomb to help highlight the Master Gracey Stone at night. I also used the underside of the tomb to house my sound system and speakers that played my Halloween Atmosphere FX during Halloween night.
Overall it was a long build with many things to learn during the process but it was also a fun build and a prop I was fairly fond with in the end. The great thing is I can still improve upon this prop this year and make it look closer to the original by adding the various pieces I couldn't this year due to time and money but even if I don't it is still a great central piece to my forthcoming Disney Haunted Mansion themed cemetery and one I am finally happy to have built.
Below are all the progress pictures I took during the process. I hope these will help you see the process a little more clearly than maybe I explained it here and of course if you have any comments you may please feel free to leave them in the comments section of this post.
Next up is my build process for my Madame Leota tombstone. This is one I have started but is still unfinished so hopefully I can take you all along for the ride to it's completion.
Frightguy~




Today's post is all about my Master Gracey Tombstone Build for the 2015 Haunt.
Now if I have not stated it before I will once more...I love the Disney Haunted Mansion. It has to be the main reason I took a liking to the weird and macabre and a definite reason I love haunting.
Every year that I have done a yard display I have for the most part used the same foam carved tombstones which I created in one night back in 2012. I remember having just moved into our new home and being so excited about creating my first ever scene on my front lawn but all of my older stones were pretty worn out so I bought foam and quickly dremeled various epitaps into each stone, added some rough cracks here and there then furiously painted each. It was so late at night at one point and I had my garage door open while working on adding some highlights with some spray paint that cops had stopped in front of my house wondering what I was doing! It felt funny telling them that I was making prop tombstones for Halloween but they ok have fun shook their heads and drove along.
I made 13 tombstones that year and remember chasing half of them down the block when the winds and rains of super storm sandy came bustling through. At that very moment I vowed that one day I would make durable tombstones that would not only look real but would stand both the tests of time and the crazy weather that we can experience in NJ from time to time.
The years following 2012 I scaled back on using tombstones to go with a more natural look of scarecrows and cornstalks but this year I knew I wanted to bring back the cemetery and I had to begin the task of create a more sturdy stone so I began thinking about how I was going to go about it.
I wasn't really trying to re-invent the wheel since there are plenty of techniques that can be found on line about tombstone prop making but I wanted to think out the process for myself and find a solution that worked best for me. In the end I was going to have to store these things and I didn't ever want to have to make them again so finding the right solution was important to me.
At first I thought about a hollow construction made out of plywood which would make them slightly lightweight but heavy enough that they would not fly away on me. Where I struggled with this design idea was how I would fill in the gaps on the top and sides of the stone. If I made any unique curves I just didn't know how would I close them up. I toyed with the idea of running wood laminate around the outside as well as the possibility of using spray foam and that's where things started to click for me. I would trace my tombstone shape onto wood and cut out the same shape for the front and back then use insulation foam like I normally would to make a tombstone and sandwich it in between both pieces of wood until I got the desired depth I wanted for the stone.
I used the front of the tombstone which I cut from wood as a template to trace and cut out the pieces of foam and began layering or I should say stacking my tombstone sandwich up until I reached my desired depth. Since the foam I was using was older left over foam it didn't cut all that well so the edges were pretty jagged after being cut but that was ok, I was going to use a rasp and sander to smooth the edges out once everything was glued together.
I used a combination of gorilla glue and great stuff foam in between each layer, stacked it all together then set some patio stones on top and left it to dry. Once I was convinced the stone was completely dry I began to sand down the edgesso that everything was nice and even but there were still gaps and cracks and I wanted the sides and top of the stone to be nice, smooth and seamless so next up on my mind was how was I going to fill everything in and smooth it out?!!
When contemplating what I should used to fill in the gaps and cracks on my tombstones edges I thought of multiple ways I could do it from Monster Mud to bondo but ultimately I used what I already had on hand and that was wood filler. I knew it would dry hard so I just said the hell with it and figured this was all trial and error anyways but it worked out quite nice! I spread the wood filer on with a spatula and in areas that weren't as easy I simply used my hands. I would say it took me 2-3 passes with the wood filer before I looked at all the edges and they seemed fully filled in. Once dry I proceeded to sand the sides until smooth. I choose to not fill in the underside of the tombstone with the wood filer and instead seal it off with plywood as well in order for the stone to be able to sit flush on the above ground tomb that I would later build.
The next step (which I should have explained more towards the beginning of the write up) was the epitaph. I was able to find a good copy of the Master Gracey Epitaph online and took that into a computer program I had Illustrator and sized it accordingly. Once sized I printed it out then used the printout to trace and transfer the letters onto the wood. Originally I was going to use a projector to project the image of the tombstone and trace the letters like that but found it to be a bit difficult so I scrapped that idea fairly quickly.
After all the letters were in place I used a dremel and routers bit to router out the letters into the wood. Now I had never really used a router before so it wasn't so easy getting all the letters to be perfect especially in wood so while I wouldn't rule out doing this method again I think I would instead glue a piece of 1" foam to the front wood piece and dremel the words into it just for the ease of doing it because etching out the letters in the wood really took some time and patience but I got through it. Some of the letters didn't come out great but you could read the entire wording and after paint and putting it outside at night I felt the few flaws it did have wouldn't really be noticeable to the average Joe.
The painting process was the easiest part. Time was dwindling down so I knew I wasn't going to be able to match up the paint scheme of the original so I choose to give the stone a black base then bought my ever so favorite stone spray paint which gave it that nice stone texture. To age it up a bit I sprayed on some watered down black paint and dry brushed a few areas with some green and browns. I went back into the type and painted in each letter with black just so they would stand out and poof, just like that the stone was complete!
The next and final task was the above ground tomb the stone would sit on. Now the Disney version is actually quite nice. It is a brick base, the top edges are surrounded by a small black metal gate with golden toppers at each of the four corners and the center is real grass. The stone actually sits at the back end of the tomb in the grass.
How the heck was I going to pull all of this off I wondered?!! My time was very short and to reiterate I was also short on money so I searched around my garage and found left over faux brick siding I had used years ago on the first set of columns I ever built for Grimlock Manor. I also had plenty of spare lumber, green outdoor carpeting and rope so I decided these were the items I would use and all I had to do was find some finials online.
I constructed a frame for the tomb out of some 2 x 2s I had then covered the the front and both sides with the brick paneling but left the back open which I will get to why I did that shortly. I then covered the top of the tomb with a flat piece of plywood. Around the edges I drilled hole to fit in PVC piping which would be my fencing. I added my outdoor grass carpet to the top of the plywood, painted the PVC piping black, added my finials to the top of each PVC pipe then ran rope around each piece of PVC. I had wanted black chain but again just went with what was handy.
Now that most of the tomb was set I drilled 2 holes in the base of the tombstone and to matching holes on the base of the tomb. I inserted PVC into each hole of the tombstone then slide the tombstone into the two holes I drilled in the base of the tomb. This allowed the tombstone to sit very sturdy on the tomb and not be blown over by any strong winds. The PVC was also long enough to slightly stick into the ground under the tomb and having the backside open I was able to adjust everything so it fit nice and snug.
Once it was all in place I attached mini spot lights to the front of the tomb to help highlight the Master Gracey Stone at night. I also used the underside of the tomb to house my sound system and speakers that played my Halloween Atmosphere FX during Halloween night.
Overall it was a long build with many things to learn during the process but it was also a fun build and a prop I was fairly fond with in the end. The great thing is I can still improve upon this prop this year and make it look closer to the original by adding the various pieces I couldn't this year due to time and money but even if I don't it is still a great central piece to my forthcoming Disney Haunted Mansion themed cemetery and one I am finally happy to have built.
Below are all the progress pictures I took during the process. I hope these will help you see the process a little more clearly than maybe I explained it here and of course if you have any comments you may please feel free to leave them in the comments section of this post.
Next up is my build process for my Madame Leota tombstone. This is one I have started but is still unfinished so hopefully I can take you all along for the ride to it's completion.
Frightguy~


Wednesday, December 30, 2015
Grimlock Manor then and now.
Hello Frightners!
Happy almost 2016! I felt a post seemed appropriate since we are knocking on the door of a new year. For me this is just a way to wipe the slate clean, reminisce about this year and all I have done with the haunt and look ahead at what I would like to do with it. I say what I would like to do simply because I would love to do so much and always have a million plans but it never means that any will actually get done so I feel it is best to set the bar low and see how far I can go!
2015 was a pretty good year in terms of Grimlock Manor. While I didn't necessarily do anything ground breaking my haunt came together fairly well. Originally at the end of last year I had decided that I wanted to do a Sleepy Hollow theme this year and piggy back off the Sleepy Hollow play I had worked on at the Old Franklin School House in Metuchen NJ. I had a nice burlap painted sign from the play and many scarecrows to help fill out my display but I never truly built any other props that fit the theme, instead my rekindle love for the Disney Haunted Mansion took over after a trip to Disney World Orlando and I began a few late prop builds for that theme this year.
The prop I started and completed thought I wasn't 100% happy with it was my Master Gracey Tombstone. I set out to create a much more durable tombstone and was happy with it's outcome but the stone itself lays atop an above ground tomb which I did not fully complete to look like the one that can be found on the que line of the ride. I pretty much pinched my pennies and built what I could with what I had lying around and I was fine with that but improvements can still be made.
After I finished my Master Gracey Stone I started work on my Madame Leota tombstone. This is where time fell short and I did not complete it. The goal with Madame Leota was to sculpt the head which I did start then eventually cast it in a light weight resin and make the tombstone the same way as Master Gracey. As I said not everything was completed so it currently sits in my shop awaiting my return to work on it.
Many other ideas like a mausoleum, new graveyard characters, pillars and a fence never fully materialized so my goal now is to focus on making the Haunted Mansion come to life in 2016! As I stated above the bar will be set low and I will focus on a prop at a time and simply see where it takes me by the time October comes around but I do feel that I can up the anty this year.
I told a friend recently that I have never fully stood back and looked at any of my displays or walkthroughs with complete satisfaction and honestly I never feel that will ever be a reality but I am sure going to strive to bring a little sense of wonderment to everyone who visits my house this year.
I've been haunting since 2008 now and have seen so many great things done in the haunt world and while I have had many accomplishments I am proud of Grimlock Manor being one of them, I am still looking forward to what more I can do and prove to myself and I think that is the key, being happy with what you do.
I have much more to explore in the world of prop build and many more triumphs and failures still ahead of me but it is sure to be a fun ride. My resolution as it goes for haunting is to truly not cut corners and focus hard on making each prop I work on the best I can make it. I hope to blog and vlog my journey to Halloween 2016 so it's time to get cracking now and see what I am truly capable of as an artist and haunter!
Here's to 2016 my fellow haunters! Lets all get to work!
Frightguy~
Happy almost 2016! I felt a post seemed appropriate since we are knocking on the door of a new year. For me this is just a way to wipe the slate clean, reminisce about this year and all I have done with the haunt and look ahead at what I would like to do with it. I say what I would like to do simply because I would love to do so much and always have a million plans but it never means that any will actually get done so I feel it is best to set the bar low and see how far I can go!
2015 was a pretty good year in terms of Grimlock Manor. While I didn't necessarily do anything ground breaking my haunt came together fairly well. Originally at the end of last year I had decided that I wanted to do a Sleepy Hollow theme this year and piggy back off the Sleepy Hollow play I had worked on at the Old Franklin School House in Metuchen NJ. I had a nice burlap painted sign from the play and many scarecrows to help fill out my display but I never truly built any other props that fit the theme, instead my rekindle love for the Disney Haunted Mansion took over after a trip to Disney World Orlando and I began a few late prop builds for that theme this year.
The prop I started and completed thought I wasn't 100% happy with it was my Master Gracey Tombstone. I set out to create a much more durable tombstone and was happy with it's outcome but the stone itself lays atop an above ground tomb which I did not fully complete to look like the one that can be found on the que line of the ride. I pretty much pinched my pennies and built what I could with what I had lying around and I was fine with that but improvements can still be made.
After I finished my Master Gracey Stone I started work on my Madame Leota tombstone. This is where time fell short and I did not complete it. The goal with Madame Leota was to sculpt the head which I did start then eventually cast it in a light weight resin and make the tombstone the same way as Master Gracey. As I said not everything was completed so it currently sits in my shop awaiting my return to work on it.
Many other ideas like a mausoleum, new graveyard characters, pillars and a fence never fully materialized so my goal now is to focus on making the Haunted Mansion come to life in 2016! As I stated above the bar will be set low and I will focus on a prop at a time and simply see where it takes me by the time October comes around but I do feel that I can up the anty this year.
I told a friend recently that I have never fully stood back and looked at any of my displays or walkthroughs with complete satisfaction and honestly I never feel that will ever be a reality but I am sure going to strive to bring a little sense of wonderment to everyone who visits my house this year.
I've been haunting since 2008 now and have seen so many great things done in the haunt world and while I have had many accomplishments I am proud of Grimlock Manor being one of them, I am still looking forward to what more I can do and prove to myself and I think that is the key, being happy with what you do.
I have much more to explore in the world of prop build and many more triumphs and failures still ahead of me but it is sure to be a fun ride. My resolution as it goes for haunting is to truly not cut corners and focus hard on making each prop I work on the best I can make it. I hope to blog and vlog my journey to Halloween 2016 so it's time to get cracking now and see what I am truly capable of as an artist and haunter!
Here's to 2016 my fellow haunters! Lets all get to work!
Frightguy~
Sunday, November 23, 2014
2014 Haunt
Hello Frightners.
It seems every time I write a post it starts with "man it's been awhile!" but that's the truth. Ive never been a faithful blogger but as I was thumbing through my blog posts yesterday I realized how fun it was to look back at all have done and seen and posted about Halloween and Haunting these past few years so I wanted to give a few new posts a whirl so lets see how it goes.
This year we had one of our best haunts to date. It is our third year living here in Roselle Park NJ and technically only our second year with an actual Halloween because super storm Sandy hit us our first year and ruined our Halloween.
This year I really had fun with our haunt as both my wife and daughter who is two and a half now both helped me in putting our display together.
We have been steering away from the traditional cemetery the past two years now and creating scarecrows, witch lamps and creepy trees to decorate the lawn with and I have to tell you I love creating the scarecrows! Each scarecrow ends up taking on its own unique personality with their creepy grins and unique burlap duds and there is just an over all presence about them that I love as do the tots and their parents.
Besides the scarecrows we created our first ever cauldron creep (credit to Devils Chariot the original CC creator.) The only different with our CC was that his head did not move, we opted to invest in a Fright Props talking skull and I am happy we did because it went over great with everyone. In the middle of our home made cornfield sat our CC stirring his cauldron while reciting "To Become A Werewolf" as read by Vincent Price. I have to say if your a haunter looking for an easy to use realistic looking talking skull the the Fright Props skull really delivers.
I will post pictures and video as soon as I can get around too it but here is a little collection below as taken by my sister in law on Halloween night,
I hope everyone enjoyed their Halloweens this year and I hope to resurrect this blog a little with some upcoming builds we have in store and a few daily banters.
Frightguy~

It seems every time I write a post it starts with "man it's been awhile!" but that's the truth. Ive never been a faithful blogger but as I was thumbing through my blog posts yesterday I realized how fun it was to look back at all have done and seen and posted about Halloween and Haunting these past few years so I wanted to give a few new posts a whirl so lets see how it goes.
This year we had one of our best haunts to date. It is our third year living here in Roselle Park NJ and technically only our second year with an actual Halloween because super storm Sandy hit us our first year and ruined our Halloween.
This year I really had fun with our haunt as both my wife and daughter who is two and a half now both helped me in putting our display together.
We have been steering away from the traditional cemetery the past two years now and creating scarecrows, witch lamps and creepy trees to decorate the lawn with and I have to tell you I love creating the scarecrows! Each scarecrow ends up taking on its own unique personality with their creepy grins and unique burlap duds and there is just an over all presence about them that I love as do the tots and their parents.
Besides the scarecrows we created our first ever cauldron creep (credit to Devils Chariot the original CC creator.) The only different with our CC was that his head did not move, we opted to invest in a Fright Props talking skull and I am happy we did because it went over great with everyone. In the middle of our home made cornfield sat our CC stirring his cauldron while reciting "To Become A Werewolf" as read by Vincent Price. I have to say if your a haunter looking for an easy to use realistic looking talking skull the the Fright Props skull really delivers.
I will post pictures and video as soon as I can get around too it but here is a little collection below as taken by my sister in law on Halloween night,
I hope everyone enjoyed their Halloweens this year and I hope to resurrect this blog a little with some upcoming builds we have in store and a few daily banters.
Frightguy~
Saturday, October 20, 2012
It's Almost Halloween!
Hey Frightners!
Well man o man! It's been awhile since my last post. I've been so busy with work, my daughter Harper, and getting ready for Halloween that it has been hard to post to the blog lately so I apologize for that but I will have some posts coming to show progress on our set up for this year.
Again, this is out first year in our very own house so it has been exciting to finally decorate a place of our own and not an apartment or my parents house. It's been a little hard to get everything done that I would like because of course daddy duty has been kicking in and with a 6 month old to look after there isn't much free time to be had!
Below are some initial pictures of our Haunt so far. We still have more props and fine details to add and most stuff probably won't go out until the night before or day of Halloween like all of our animitronic props but at least is something to share with you! More pictures and our annual haunt video to come!
By the way Harper, our daughter, loves all the props and lights! She is a true haunter in the making!
Hope your set ups are going well and I can't wait till Halloween!
Frightguy~


Well man o man! It's been awhile since my last post. I've been so busy with work, my daughter Harper, and getting ready for Halloween that it has been hard to post to the blog lately so I apologize for that but I will have some posts coming to show progress on our set up for this year.
Again, this is out first year in our very own house so it has been exciting to finally decorate a place of our own and not an apartment or my parents house. It's been a little hard to get everything done that I would like because of course daddy duty has been kicking in and with a 6 month old to look after there isn't much free time to be had!
Below are some initial pictures of our Haunt so far. We still have more props and fine details to add and most stuff probably won't go out until the night before or day of Halloween like all of our animitronic props but at least is something to share with you! More pictures and our annual haunt video to come!
By the way Harper, our daughter, loves all the props and lights! She is a true haunter in the making!
Hope your set ups are going well and I can't wait till Halloween!
Frightguy~


Saturday, June 16, 2012
Madame Leota
Hey Frightners!
Boy it's been awhile and I seem to start each of my posts with that but the fact is little Mrs. Harper Rose is quite the handful so much so that I have been thinking of starting another blog just about her and my experiences as a first time father but then I really wouldn't have any time on my hands!
Well back to my post. As you can see by the title I'm talking about Madame Leota today. Not much of a new subject for me really since last halloween I focused on making my first every Madame Leota projection effect prop for my haunt and a majority of my posts featured my progress but I wanted to circle back to it since I have been having new ideas on making a new Madame Leota prop this year but something more of a decorative piece rather than the projected effect which I will still use this year in my bay window of my home.
Madame Leota and the Haunted Mansion are both near and dear to me as I am sure they are to most haunters out there. When telling our stories of how we came to love Halloween and haunting most of the haunters I know will say some of their first and fondest memories are of going to the Haunted Mansion, maybe we should start crediting Mr. Disney for being the first haunter ever and thank him for his contributions to our community...but that is a whole other post entirely so back to Madame Leota.
Madame Leota is such a classic and central figure to the Haunted Mansion. Her blinking tombstone is featured in the que line of the attraction and quite a few haunters have started to try to replicate it to add as an addition to their haunts, one in particular is a friend of mine Kristy of the home haunt Noble Manor. You can watch her progress on her video blogs AKA vlogs HERE.
Besides the Madame Leota tombstone we all know and adore Madame Leota herself in all of her floating head glory that is her magical crystal ball which is one of the most impressive scenes of the Haunted Mansion Ride. We all know the rhyme...."Creepies and Crawlies, toads in a pond, let their be music from regions beyond!" of course there is much more to that but you know it!
She is such an iconic figure and one prop us haunters either have created for ourselves or have on our to-do list and it is one for me that I decided to come back to again this year after seeing William Bezeks perfectly awesome Madame Leota piece seen below.

I stumbled upon Williams Blog while searching for Leota images to reference in a new art piece I am working on currently and I am throughly impressed by it. As you can read on on his blog http://williambezek.blogspot.com much of his family worked at Disneyland as he grew up as a child so he spent countless hours at the park (lucky him!) his favorite ride becoming The Haunted Mansion an thus Madame Leota became a source of inspiration for him in his art.

I really love the detail in this piece from the glass dome which is hand blown glass from Germany to the coloring of the hair and perfectly sculpted face of Leota. Unfortunately I came across this post two years two late as he did sell this and a smaller version on his Etsy site. I would have loved to buy one of them!

Williams work has greatly inspired my new Leota piece which I will have more on as progress takes off but I think this is a constant reminder how one iconic figure can become a source of inspiration for generations of artists and haunters alike. I myself doubt that I will ever get tired of creating props of Leota or anything from the Haunted Mansion for that matter.

Enjoy!
Frightguy~
Boy it's been awhile and I seem to start each of my posts with that but the fact is little Mrs. Harper Rose is quite the handful so much so that I have been thinking of starting another blog just about her and my experiences as a first time father but then I really wouldn't have any time on my hands!
Well back to my post. As you can see by the title I'm talking about Madame Leota today. Not much of a new subject for me really since last halloween I focused on making my first every Madame Leota projection effect prop for my haunt and a majority of my posts featured my progress but I wanted to circle back to it since I have been having new ideas on making a new Madame Leota prop this year but something more of a decorative piece rather than the projected effect which I will still use this year in my bay window of my home.
Madame Leota and the Haunted Mansion are both near and dear to me as I am sure they are to most haunters out there. When telling our stories of how we came to love Halloween and haunting most of the haunters I know will say some of their first and fondest memories are of going to the Haunted Mansion, maybe we should start crediting Mr. Disney for being the first haunter ever and thank him for his contributions to our community...but that is a whole other post entirely so back to Madame Leota.
Madame Leota is such a classic and central figure to the Haunted Mansion. Her blinking tombstone is featured in the que line of the attraction and quite a few haunters have started to try to replicate it to add as an addition to their haunts, one in particular is a friend of mine Kristy of the home haunt Noble Manor. You can watch her progress on her video blogs AKA vlogs HERE.
Besides the Madame Leota tombstone we all know and adore Madame Leota herself in all of her floating head glory that is her magical crystal ball which is one of the most impressive scenes of the Haunted Mansion Ride. We all know the rhyme...."Creepies and Crawlies, toads in a pond, let their be music from regions beyond!" of course there is much more to that but you know it!
She is such an iconic figure and one prop us haunters either have created for ourselves or have on our to-do list and it is one for me that I decided to come back to again this year after seeing William Bezeks perfectly awesome Madame Leota piece seen below.


Enjoy!
Frightguy~
Subscribe to:
Posts (Atom)


